Create a Power BI Service Principal Profile

For Power Automate to use the Power BI Rest API it needs a service principal profile. This is created by creating an app registration that has the right permissions. This allows an app, e.g. Power Automate, to establish a trust relationship with the Microsoft identity platform. This is done using Entra Admin Center (previously known as Active Directory)
This post is part of the Power Automate and Power BI Rest API series
Create App Registration for Service Principal
Navigate to https://entra.microsoft.com/. Then in the menu expand Identity and under that Applications. Finally click on App Registrations to open the list of App Registrations. It defaults to list registrations owned by you.
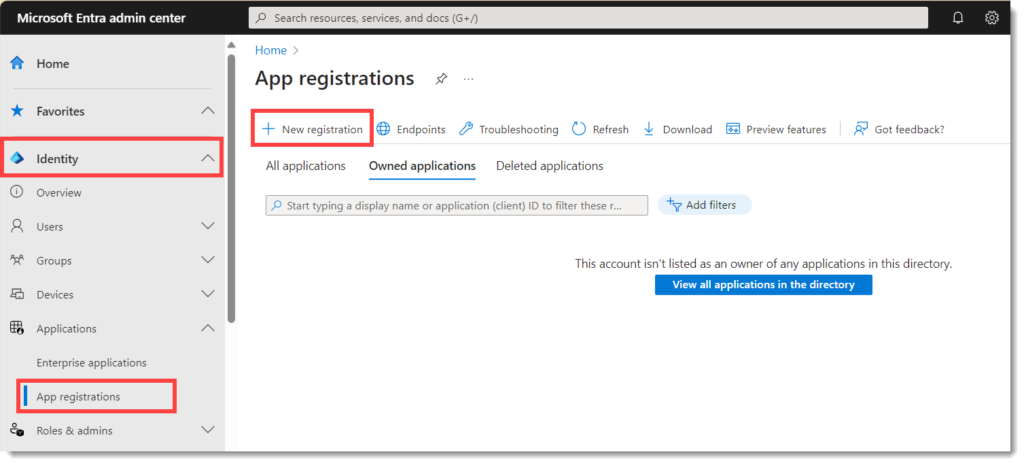
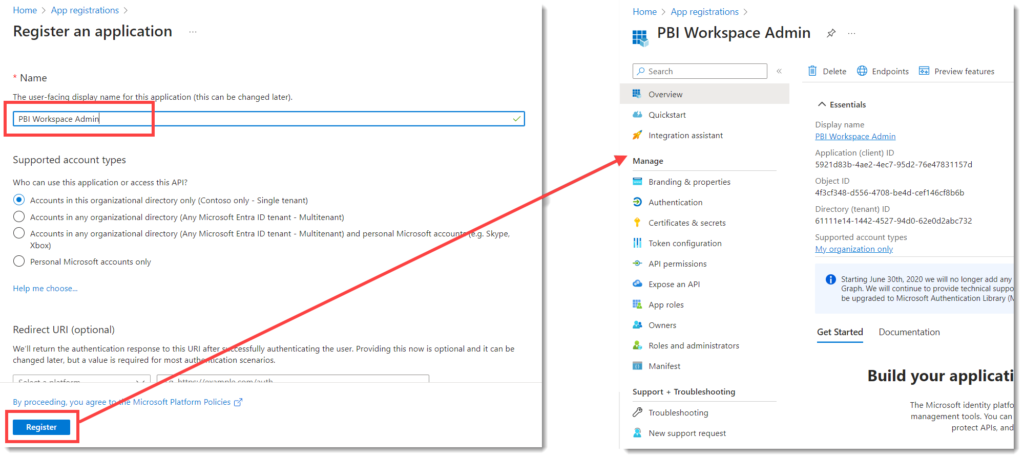
Click on New registration to start creating your App registration. Enter a name for your application, remember to make clear as over time the list will grow. Leave rest of the options as default and press the Register button.
Change App Registration Ownership
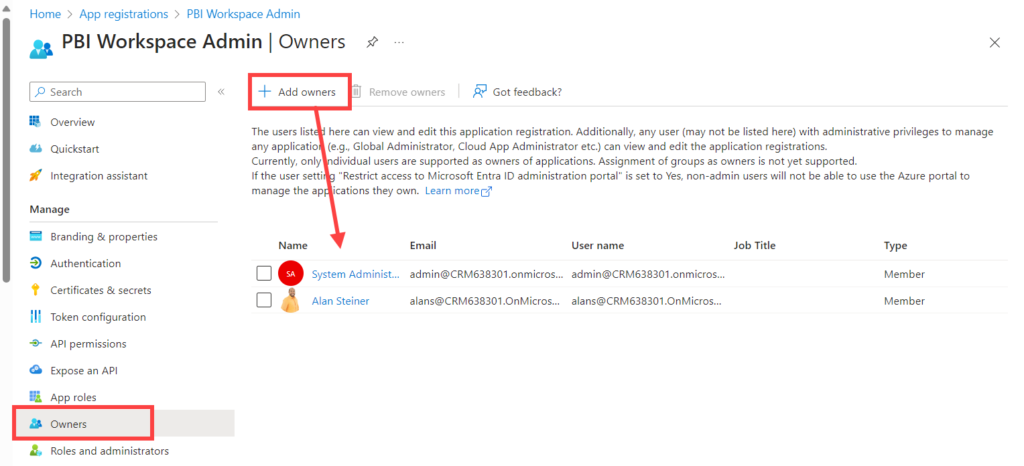
It is recommended that you add owners to the registration. Click on Owners, then click on Add Owners and select the owners. App owners and administrators can view and edit app registrations.
Adding API Permissions
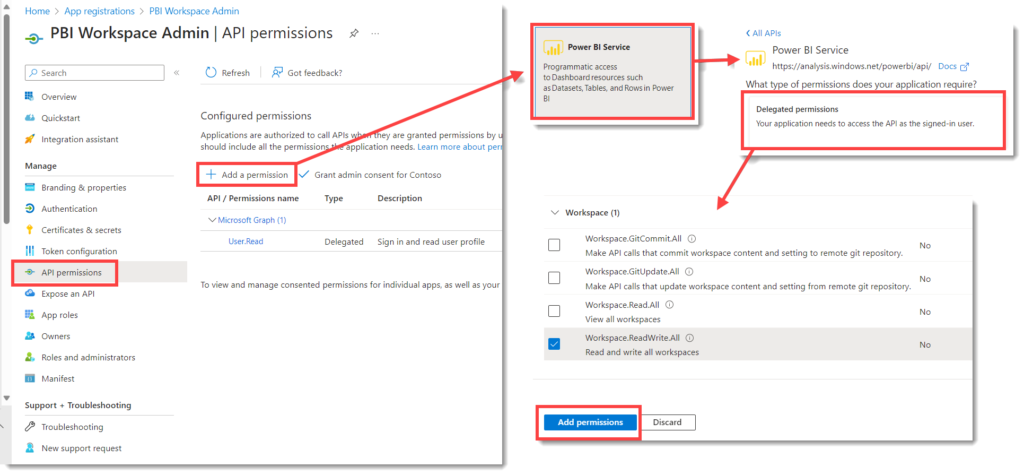
Permissions need to be given to the App Registration based on what you want to do. The Power BI Rest API documentation at https://learn.microsoft.com/en-us/rest/api/power-bi/groups/create-group states you need Workspace.ReadWrite.All.
Click on API Permissions and then click on Add a permission. When the list of APIs appear, select Power BI service. Then select Delegated permissions and from the list of permissions select Workspace.ReadWrite.All. It is good practice to only add the permissions you need.
Adding a Secret
The final step in App Registration is to add a secret. This will be required by anyone using the app registration.
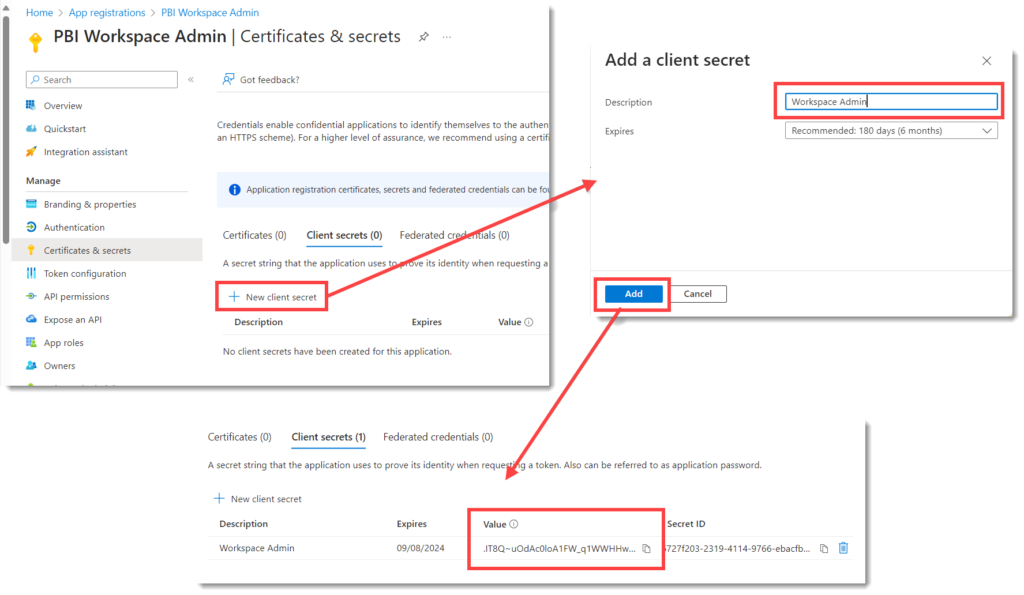
Click on Certificates & secrets, then click on New client secret. Enter in a description, I chose to keep the default 6 months expiration. Click Add to finish creating the secret.
Once the list appears you must copy the secret value. This is the only chance you get.
Important Information
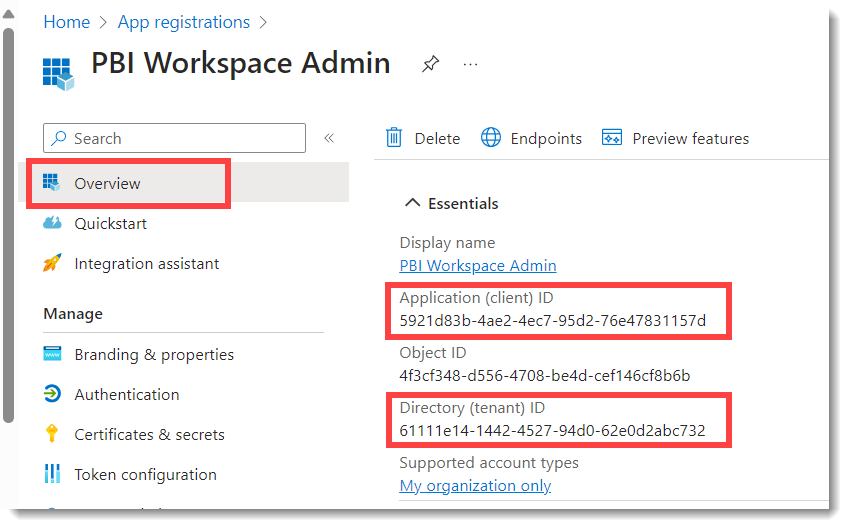
You will need the Secret value copied from the last section and the Tenant ID and Client ID. The final 2 values can be found by clicking on Overview. These values especially the secret need to be kept secure. So the next post is how to create an Azure Key Vault to store the values.
Conclusion
Understanding how App Extensions and Service Principals work is very useful not only for Power BI Rest api. The Microsoft Graph api can also be accessed using a service principal but that is a whole different series.
More Power Automate Posts
- Creating Adaptive Cards
- Refreshing Datasets Automatically with Power BI Dataflows
- Power Automate Child Flow
- Get data from a Power BI dataset
- Power Automate Button in a Power BI Report
- Write Me a Flow
- Power Automate and DevOps series
- Power Automate and Power BI Rest API series
- Save a File to OneLake Lakehouse
- Trigger Microsoft Fabric Data Pipeline using Power Automate
More Power BI Posts
- Conditional Formatting Update
- Data Refresh Date
- Using Inactive Relationships in a Measure
- DAX CrossFilter Function
- COALESCE Function to Remove Blanks
- Personalize Visuals
- Gradient Legends
- Endorse a Dataset as Promoted or Certified
- Q&A Synonyms Update
- Import Text Using Examples
- Paginated Report Resources
- Refreshing Datasets Automatically with Power BI Dataflows
- Charticulator
- Dataverse Connector – July 2022 Update
- Dataverse Choice Columns
- Switch Dataverse Tenancy
- Connecting to Google Analytics
- Take Over a Dataset
- Export Data from Power BI Visuals
- Embed a Paginated Report
- Using SQL on Dataverse for Power BI
- Power Platform Solution and Power BI Series
- Creating a Custom Smart Narrative
- Power Automate Button in a Power BI Report
1 Response